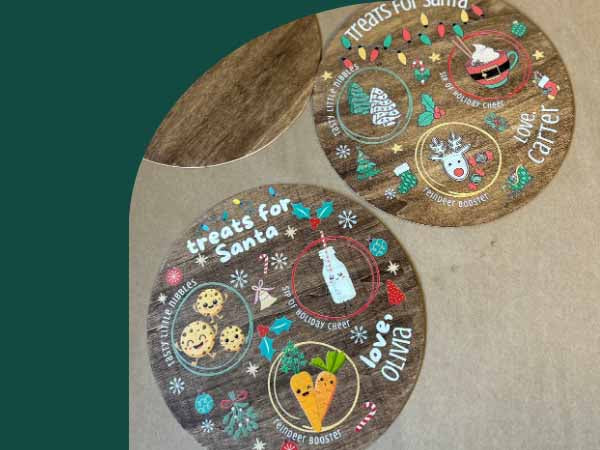
Creating a ‘Treats for Santa’ tray is a labor of love that brings the spirit of the season right into the workshop.
Let's dive into the behind-the-scenes journey of how this festive masterpiece comes to life, mistakes included – because in creativity, every error is a stepping stone to perfection!
Step 1: Staining Test Materials
To start, we test our stain colors on thinner, smaller pieces of wood. This helps us nail down the exact shade without using up our high-quality wood. Choosing a stain that highlights the wood’s natural beauty while fitting the holiday theme is essential, and these tests ensure it’s the perfect warm and cozy tone.
Applying the stain evenly and allowing it to dry can take a little patience, but the result is worth it! While we wait for the samples to dry, we move on to the next part of the process - the design.
Step 2: Designing While It Dries
While the trays are drying, it’s design time! We experiment with different fonts, graphics, and playful phrases like “fuel for flying" or “magic reindeer snacks" to bring the tray to life. Since each tray is personalized, this step is all about capturing the whimsy and warmth of Christmas.
Once the layout is finalized, we prepare it for printing and cross our fingers the first round goes smoothly—though that’s not always the case! The excitement is building as we get closer to seeing the design come together!
Step 3: Printing on a Test Product
With our designs ready, it's showtime for the test product. This step is a bit nerve-wracking, as we transfer our digital designs onto the physical tray. It's also the moment of truth, where we see our ideas come to life.
After resizing the design and adjusting ink settings, we print the first test piece to check if all elements look perfect on wood. We check everything from alignment to colors, as the design’s first appearance on wood can sometimes surprise us! It’s all part of the process to ensure the final piece will look as good as it does in our heads.
The first design looks beautiful! The second one, well...
Step 4: A Learning Curve

In our excitement after the first test, we encountered a small hiccup – we forgot to resize the design to match the smaller dimensions of the test material. Mistakes happen!
This meant parts of the design fell off the tray and onto the printer surface - where it will haunt me for eternity. So it was back to resizing and reprinting. While frustrating, these mistakes are all part of the process and help us ensure the final product is flawless!
Step 5: The Final Version

After tweaking, adjusting, and learning from our mistakes, the final version stands ready for its close-up. There’s nothing quite like seeing that first completed tray, imagining it laid out on Christmas Eve with treats for Santa and his reindeer.
As we prepare it for its debut in our Christmas collection, we're filled with pride and excitement. This tray isn't just a piece of decor; it’s a bearer of cookies for Santa, and more importantly, of memories for families.

From start to finish, each tray carries a bit of holiday magic, and we can’t wait to see how it lights up your celebrations this season - check out the final version here. Happy holidays, and may Santa enjoy every treat you leave on your tray! 🎄


